What is Keyframe Interpolation in After Effects?
Interpolation in Mathematical terms is an estimated calculation of figuring out the unknown data points within a bunch of known values. (See Interpolation on Wikipedia).
And here is how Adobe defines the Interpolation:
“Interpolation is the process of filling in the unknown data between two known values” – (See interpolation on Adobe’s user guide).
In After Effects, Keyframe interpolation is the process of calculating the in-between frames between any two adjacent keyframes. When you add (at-least) two keyframes with different values on the timeline for a property, After Effects automatically calculates the in-between frames for the time between the keyframes. The After Effects Keyframe interpolation is of two types, namely Spatial and Temporal.
The visual representation of keyframe interpolation i.e. the Motion Path (explained further down the article here), could be seen for the Spatial (related to space) properties like Position etc. On a Motion Path for Position animation, the square points indicate the keyframes and dotted line connecting any two squares (keyframes) indicates the interpolated frames.
Check out this article on Keyframes – Keyframes in After Effects: Introduction
Proper understanding of the keyframe interpolation is the key really to have control over the animation that you are creating. So, let’s just dig right into it and breakdown the concepts of Spatial and Temporal Interpolation and see how they’re interconnected.
In this article, you’ll learn about:
1. The After Effects’ Space-Time Continuum:
When we animate something in After Effects, we are essentially working with two types of dimensional quantities i.e. Space – 2 or 3 dimensional (with 2D or 3D coordinates) – and Time – Unidimensional but measured in FPS (Frames Per Second) to define seconds and minutes etc. These two quantities combined create what Dr. Emmett Brown says in movie “Back to the Future” a ‘Space-Time Continuum’. This Space-Time continuum is where all the physical quantities (i.e. objects/layers being animated) live.
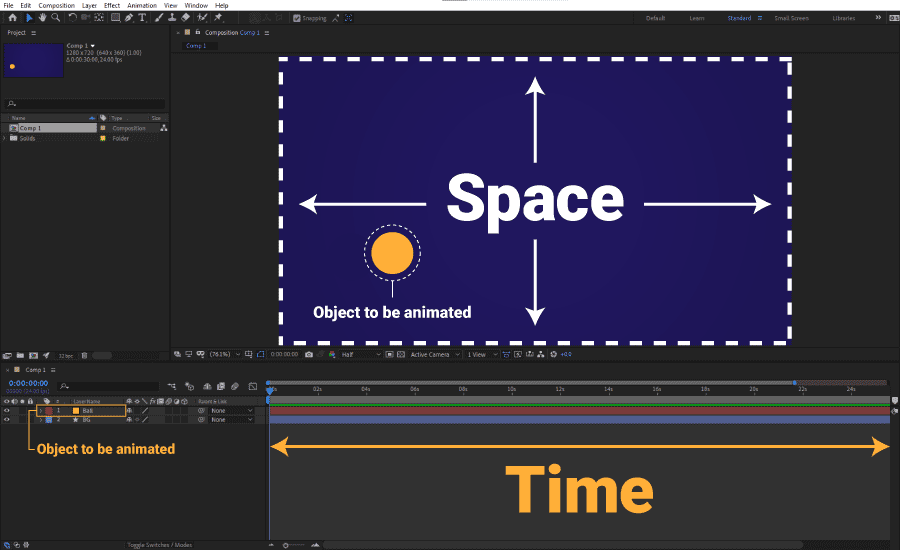
The After Effects Space and Time
Since we’re working with space and time, the keyframe interpolation is further divided into Spatial (related to space) and Temporal (related to time). In After Effects, Space is the Composition Panel (viewer area) that we might have multiple layers in. And Time is measured and controlled in the Timeline.
In the After Effects Space-Time Continuum, Composition (space) and Timeline (time) are interconnected. And that is in a way that the keyframes reside in the Timeline (under the Layer Bar) and in case of Spatial properties such as Position, we see a visual representation in the Comp Viewer (space) as a Motion Path (See Motion Path here).

Changing Spatial Interpolation to Continuous Bezier

Joined Bezier Handles (i.e. Continuous Bezier)
Which means, you can make changes to the Spatial Interpolation and values of the keyframes in the timeline including the Graph Editor and see the results and make changes to Spatial attributes such as Beziers and keyframe points for Motion Paths in the Composition Panel (Viewer Area) and vice versa.
Changing temporal Interpolation in Timeline

Making speed changes in the Speed Graph
Temporal Interpolation on the other hand can be changed from the timeline and to make the speed and motion related changes, we’ll have to turn to the Graph Editor which of course is also a part of the timeline.
The S Bit Fun Fact:
The original idea of a Space-Time Continuum for our Universe is based on Albert Einstein’s famous Theory of Relativity. But we took help from it to explain how space and time are linked in After Effects.
2. What are Motion Paths in After Effects?
It is an established fact that to animate a property in After Effects we put at least two keyframes (begin and end) to have the desired change. But you will also notice that, once you animate a Spatial Property such as Position, there will be a dotted line connecting the two or more square points in space of the object being animated, depicting the trajectory of the upcoming motion. These square points connecting this dotted line represent the keyframes, and the dotted line itself is what’s known as the ‘Motion path’.

Motion Path in After Effect
The Motion Path is an amazing representation of several things. It tells us about the Spatial path of the animation, the dots represent the position of the layer/object at each frame of the entire animated duration and the square points which represent the keyframes, also tell us about the Spatial Interpolation of each keyframe (more about Spatial Interpolation here).
You can modify a Motion Path by adding more keyframes (square points) on the path or playing with the Bezier handles of the keyframes of which the Spatial Interpolation is modified (check out Spatial Interpolation here).

Dots close together representing slow speed

Dots farther apart representing fast speed
On a Motion Path, the distance/spacing between the dots indicates the relative speed of the object in motion. If the dots are close together, it indicates slower speed or the object taking smaller steps to reach the other point. And if the dots are farther apart, it indicates a faster speed or the object taking bigger jumps.
As a recommendation, I’d say you use fewer number of points (keyframes) to keep the Motion Path simple and easy to modify pretty much like you would on a pen tool path.
3. Changing the Keyframe Interpolation Settings (Spatial/Temporal):

Changing the Spatial Interpolation

Changing the Temporal Interpolation
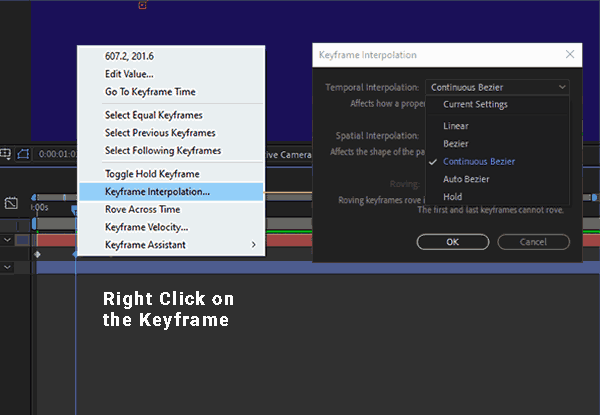
To change Spatial or Temporal Interpolation settings, right-click (Control-click on Mac) on a single keyframe or a bunch of them selected, choose Keyframe Interpolation from the contextual menu that shows up, and then select one from the various options e.g. Bezier from the Spatial or Temporal Interpolation menu. It’s that simple.
4. Spatial Interpolation in After Effects:
Spatial interpolation in After Effects is the method of creating and manipulating the Motion Paths i.e. how an animated object moves in space (2D/3D). For the animated Spatial properties of a layer in After Effects e.g. Position, there will be a Motion Path in the Composition Panel with square points on the path indicating the keyframes. Once you change the Spatial Interpolation settings for any of the keyframes in the timeline, the Motion Path will provide the relevant information visually i.e. Bezier Handles or Corner Points for the keyframe.
For Spatial Interpolation, After Effects has the following four different settings with their visual representations on the Motion Path:

Visual Representation of Spatial Interpolation Settings
a). Linear
b). Bezier
c). Continuous Bezier
d). Auto Bezier
e). Hold*
*Hold in-fact is a Temporal Interpolation setting but it does have a visual representation for Spatial properties as shown above. That’s the only reason why it’s been included in this list.
The S Bit Fun Fact:
Changing the Spatial Interpolation of a keyframe does not change the visual appearance of the keyframe icons in timeline.
5. Temporal Interpolation in After Effects:
Temporal interpolation in After Effects is the method of calculating the in-between frames, which also determines the speed of the animation. Speed factor is something that we can actually visualize on Spatial properties like Position, i.e. how big or small of a jump in space (2D/3D) an animated object takes per frame.

Dots close together resulting in slow speed

Dots farther apart resulting in fast speed
On a Motion Path, the interpolated frames are indicated by the dots on it. If the dots are really close together on the Motion Path (taking smaller jumps), it indicates that the speed for the animated object will be slow. And if the dots are farther apart from each other (taking bigger jumps), it means the speed of the object will be fast. When you play with the motion curves in the Graph Editor and adjust them with their Bezier handles, the dots on the Motion Path of a Spatial property move based on the Graph curves. That’s how you can control the speed of an object causing it to accelerate or decelerate.
In the timeline where the keyframes reside as the actual icons, once you change the Temporal Interpolation setting for a keyframe, the visual information you get is right on the timeline. And that is in the form of the keyframe icons changing their shapes depending on the option you choose from the settings.
For Temporal Interpolation, After Effects has the following five different settings with their visual representations in the Timeline:
Visual Representation of Temporal Interpolation as Keyframe Icons
f). Linear
g). Bezier and Continuous Bezier (Different Settings but same icon)
h). Auto Bezier
i). Hold
Having discussed the interpolation and going through it’s types, makes us eligible to understand all the types of keyframes there are in Adobe After Effects. This is something that we’ll go through in our next article, which you can find down below.
Check out this article on – What are the different types of keyframes in After Effects?
Related Content:
Want more on Keyframes? Check out more of our awesome related articles below
Ready to Learn After Effects?
We offer live online short workshops (2 to 5 Days) and bootcamp courses (8 to 12 – Weeks) to learn this amazing application. Whether you’re an absolute beginner or a seasoned professional, we’ve got a course to level up your skills. Check out our courses below!


