What are the Different Types of Keyframes in After Effects?
Animation (digital) is all about Keyframes and Interpolations. Even in After Effects, one can find a number of different types of them. And to animate something more convincingly in After Effects, could be that much better if you really know what these various types of keyframes are.
In After Effects, there are four basic types of keyframes (i.e. Linear, Continuous Bezier/Bezier, Auto Bezier and Hold) and six hybrid keyframes. The visual appearance of these keyframe icons depends on their Temporal Interpolation i.e. a keyframe with Linear Temporal Interpolation would be a diamond shaped keyframe and the one with Hold Interpolation would be a square shape and so on.
Various types of Keyframe Icons in After Effects
So far we’ve discussed in some of our previous articles about What are keyframes in After Effects?, – How to add/remove and navigate between keyframes and What is Keyframe Interpolation?. With all these basic and intermediate topics out of the way, it’s about time we get to know about all the various types of keyframes in After effects. It is HIGHLY RECOMMENDED that you read and understand the concepts discussed in our previous articles about Keyframes first.
In this article, you’ll learn about:
Following are the types of keyframes in After Effects:
1. No Interpolation (The I-beam Icon):
The No interpolation is the state in which a layer property doesn’t have any keyframes. Or in other words, when you turn off the stopwatch for a certain property, it’s in the No Interpolation state. In this state, the I-beam icon shows up in the Timeline panel directly under the CTI/Play-head.
I-beam icon attached to the CTI/Playhead
This no interpolation state is also very important to understand because it is the default state. And when there is no interpolation, a layer property value is absolute. Which means if you change or set the value for a layer property, it remembers it for the entire duration of the layer, unless of course an After Effects Expression has taken over it.
2. Linear Interpolation:
Linear interpolation is the default Temporal Interpolation for a keyframe. Having Linear interpolation setting for (any two subsequent) keyframes creates a constant rate of change between them, which is also indicated by equidistant dots on the Motion Path (for a Spatial Property like Position).
More on Motion Paths here – What are Motion Paths in After Effects?
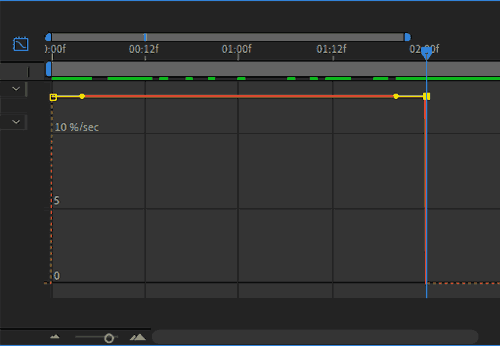
Linear Keyframes on Speed Graph
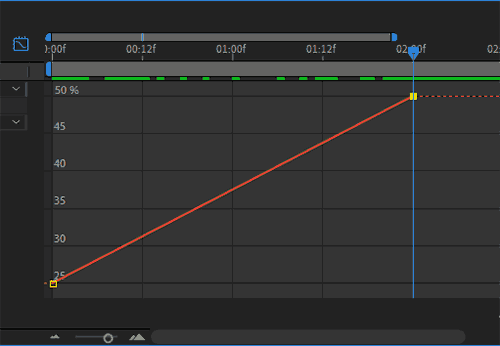
Linear Keyframes on Value Graph
Linear keyframes add a very robotic look to your animations. On the speed graph, there will always be a horizontal straight line between any two adjacent linear keyframes. The value graph for any two linear keyframes will always be a diagonal straight line no matter how steep or gentle the line may be.
The S Bit Fun Facts:
- Although you may have more than two keyframes for a property, Linear keyframes at any given moment maintain their behavior of uniform change intact between any two adjacent keyframes.
- E.g. if you have three keyframes for Rotation property, the rate of rotation will be constant between 1st and 2nd keyframe. And the moment CTI /Play-head hits the 2nd keyframe forward in time, the rate of change will be recalculated between 2nd and 3rd keyframe and for the duration between those two keyframes it will again be uniform.
- The rate of change could be different for the duration of 1st & 2nd keyframes than that of 2nd & 3rd ones but will always be constant for their (two adjacent keyframes’) respective durations.
- Although you may have more than two keyframes for a property, Linear keyframes at any given moment maintain their behavior of uniform change intact between any two adjacent keyframes.
3. Bezier Interpolation:
Bezier interpolation is an animator/motion graphics artist’s best friend mainly because it allows you to have full control over the value graph (Temporal Interpolation) and the Motion Path (Spatial Interpolation).

Bezier Interpolation on Motion Path
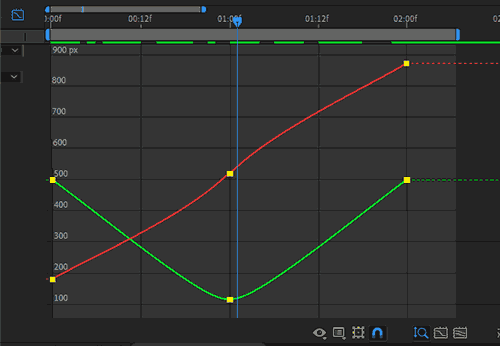
Bezier Interpolation on Value Graph
In contrast with the Continuous Bezier, the Bezier interpolation lets you move the Bezier handles independently from one another. Or in other words, it breaks apart the Bezier handles allowing you to have curves, corners and straight lines on your Motion Path (Spatial Interpolation/properties). And alter the speed, acceleration and easing on the value graph (Temporal Interpolation).
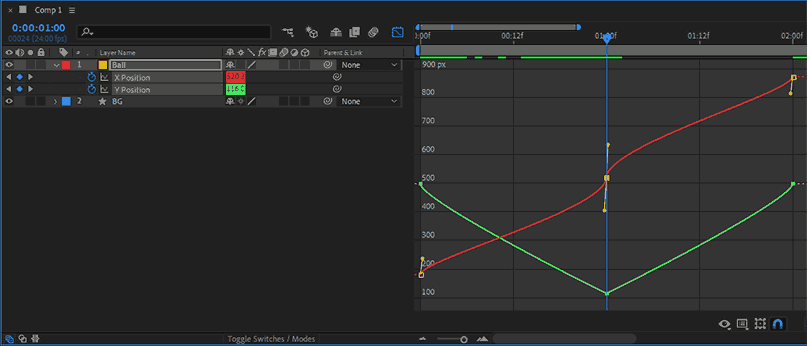
Bezier Interpolation on Value Graph (with Separate Dimensions)
But in case of Position, you need to separate the x, y (and z) dimensions (Right click on Position and choose Separate Dimensions) for you to be able to play with the bezier handles in the graph editor.
When you apply the Bezier interpolation setting to the Temporal Interpolation of say all the keyframes, the value graph of the keyframes will add slight rounding to the graph curves (just like Auto Bezier or Continuous Bezier). Which in turn, will create a slightly smoother animation. From there you can take over and customize the motion curves to make it much more meaningful
4. Continuous Bezier Interpolation:
Continuous Bezier interpolation for Motion Paths (Spatial Interpolation) gives you Bezier handles on both sides of a keyframe. These handles are joined together as one unit, allowing you to create smooth curvy paths only and that both on Motion Path and the Value Graph.
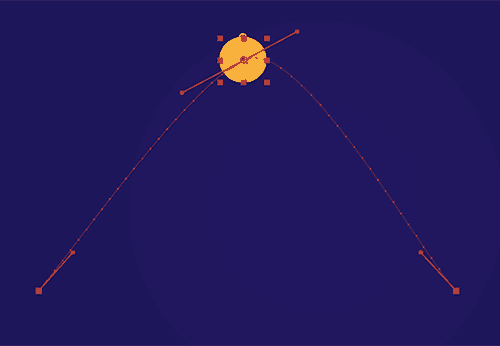
Continuous Bezier on Motion Path
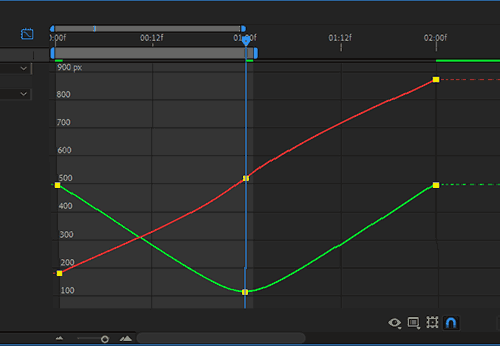
Continuous Bezier on Value Graph
Again just like Bezier Interpolation in case of Position, you’ll have to separate the x, y (and z) dimensions (Right click on Position and choose Separate Dimensions) for you to be able to manipulate the bezier handles in the graph editor.
On the Temporal front, the Continuous Bezier gives you handles in the value graph on both sides of the keyframe. That are again joined together and allow you to manually adjust the graph curve (smooth curves only).
When you apply the Continuous Bezier interpolation setting to the Temporal Interpolation of all the keyframes in the timeline (just like Auto Bezier or Bezier), the value graph of the keyframes will add slight eased motion to the curves. And of course you can customize the motion curves.
5. Auto Bezier Interpolation:
Auto Bezier interpolation is the default method for Spatial Interpolation that creates automatically calculated curvy paths of motion. When a few (three or more) keyframes are at different points in space, you can actually see the imaginary handle points indicated by circular dots. If you click on either of these dots, they will immediately turn into proper handles and your Spatial Interpolation will be changed into Continuous Bezier.
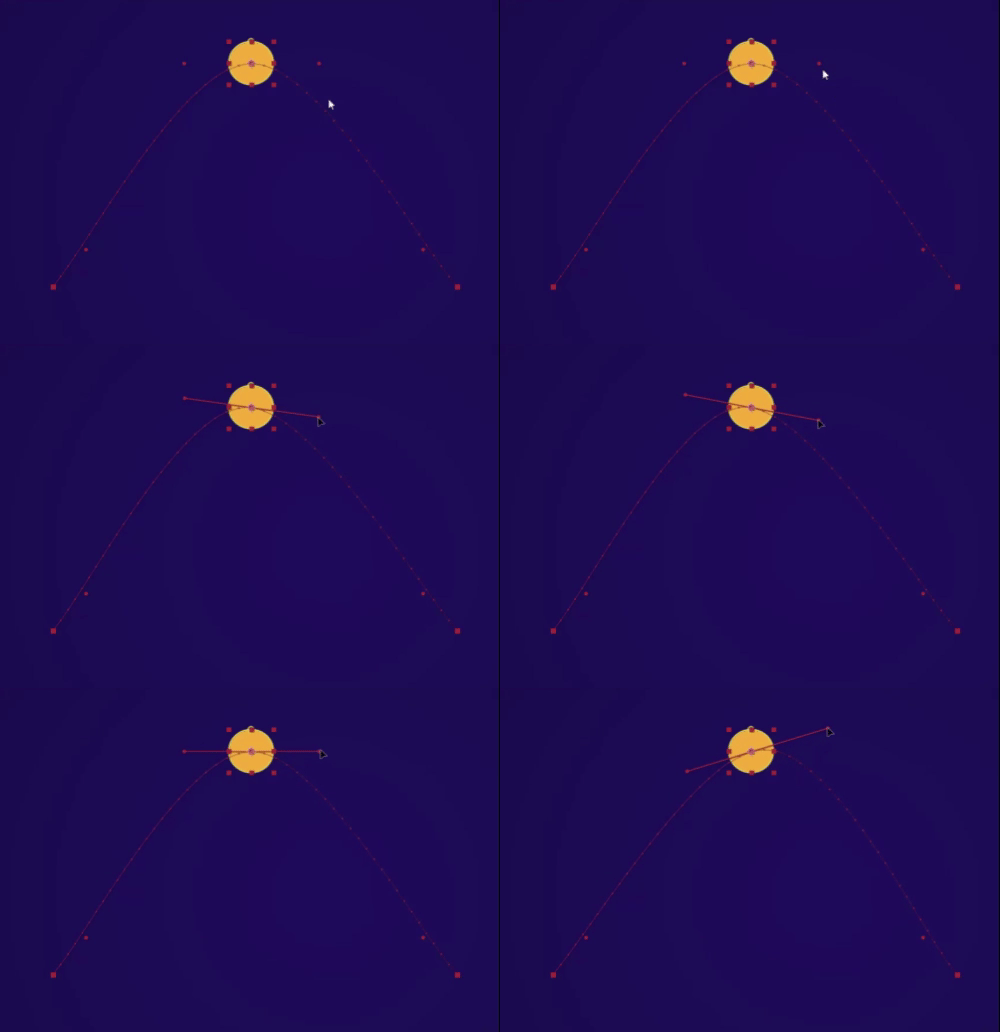
Auto Bezier to Continuous Bezier by touching the Dots
If you apply the Auto Bezier interpolation setting to the Temporal Interpolation of the keyframes in the timeline (just like Continuous Bezier or Bezier), the value graph of the keyframes will add slight roundness to the curves under the influence of the handles. But just like the Spatial Interpolation, if you click on any of the handles; it gets converted into Continuous Bezier.
6. Hold Interpolation:
Hold interpolation is the Temporal Interpolation only setting, that allows you to jump from Point A to Point B without the smooth transition between the values. In other words, Hold interpolation setting disregards the interpolation behavior (i.e. calculating the in-between frames) of After Effects.
Hold interpolation setting can be used to simulate the frame by frame animation style without having to worry about it interpolating/tweening. For some properties, Hold interpolation works just like an on off switch. Another cool way to use this setting is to simulate the effect of disco lights i.e. lights turning on and off with different light intensities.
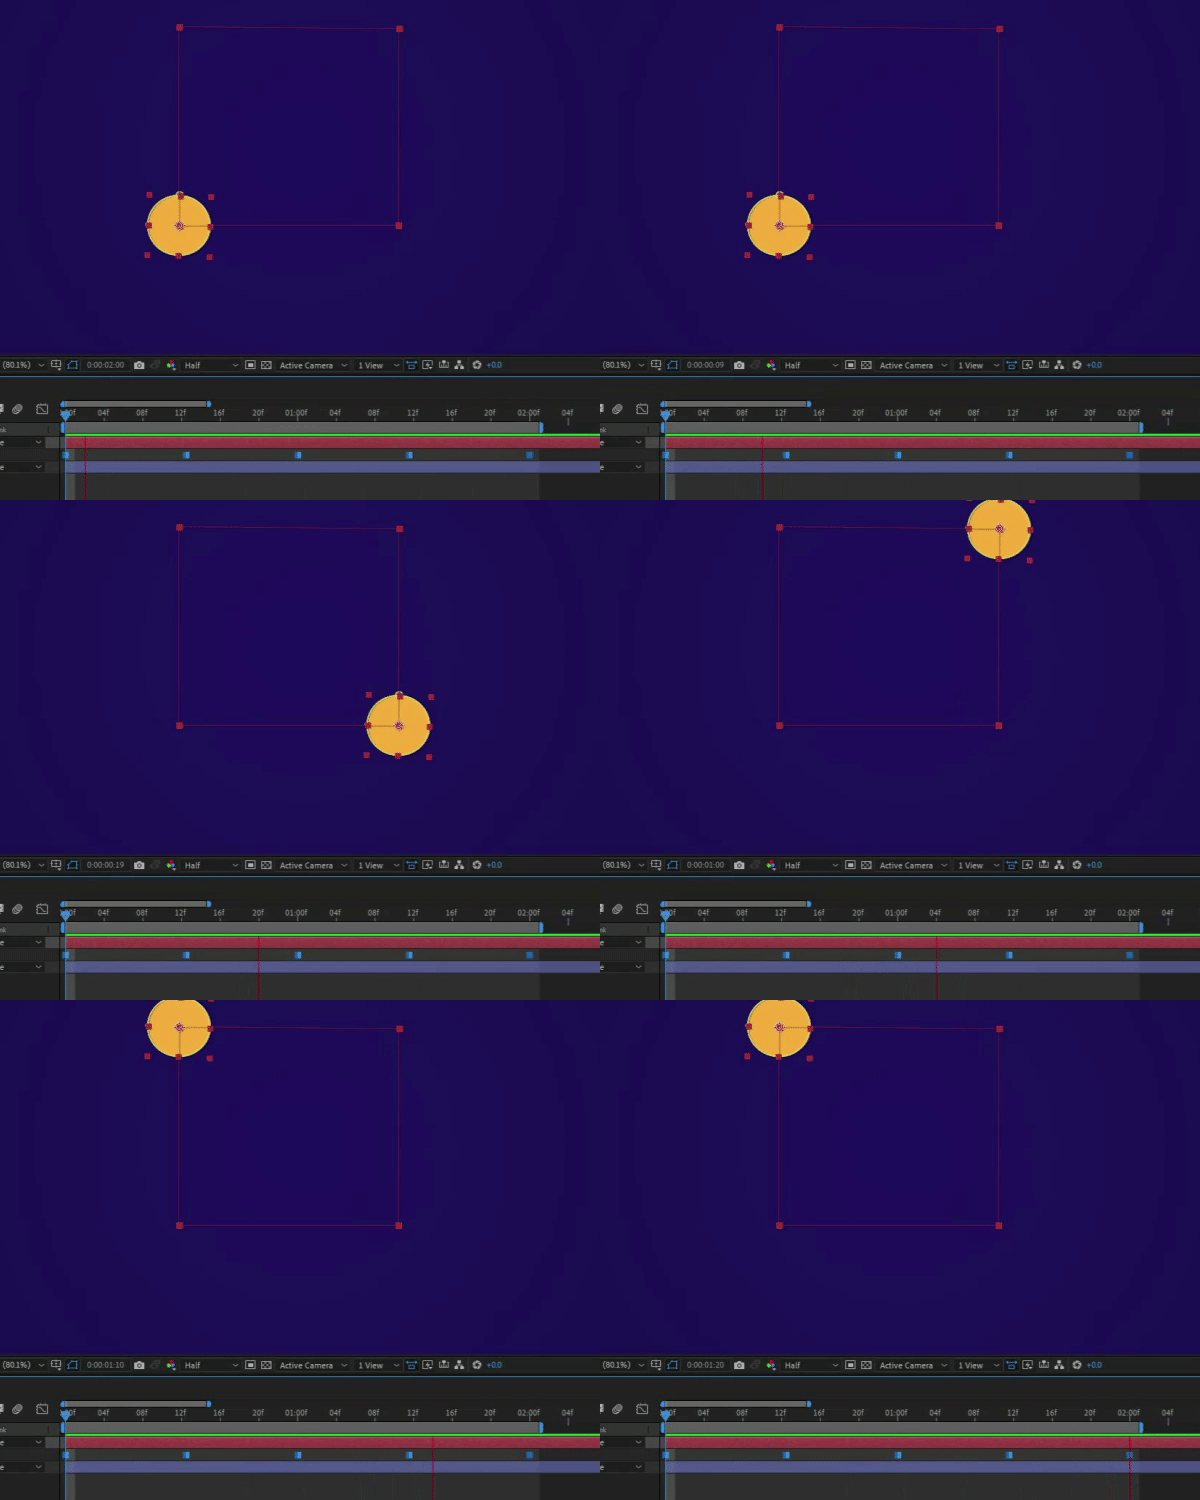
Hold Keyframe Icons and Result
Although the Hold interpolation is the Temporal only setting, it still shows itself on the Motion path for Spatial properties. For Spatial properties like Position, Anchor Point etc., the small dots (interpolated frames) on the Motion path disappear and you just see the square points (keyframes) connected by a line (path). On the Value Graph, the Hold keyframes look like a straight horizonal lines with stair stepping or peaks and valleys quite like digital signal graph.
Another very cool example of the Hold keyframes is the Source Text property. For the text layers in After Effects, there is a property called Source Text. This property can only have the Hold keyframes which allows you to have different pieces of text at different points in time in the timeline on the same layer.
7. Keyframes with Dual Nature (Hybrid Keyframes):
By default, a keyframe would use only one type of Temporal Interpolation (linear for example). But in some cases, a keyframe might show dual nature as well. Which means one half of the keyframe is Linear (incoming/outgoing) while the other half could be Hold or Bezier (e.g. Toggle Hold or Ease In/Out settings). This is something that I call hybrid keyframes. A couple of other examples of these are discussed below.
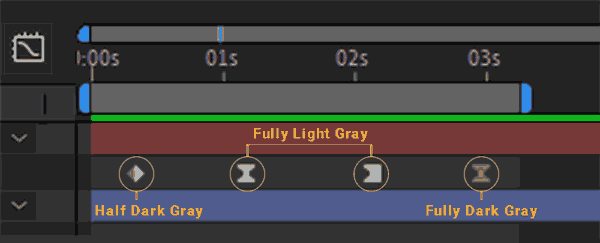
Keyframes with Dual Nature (Unselected)
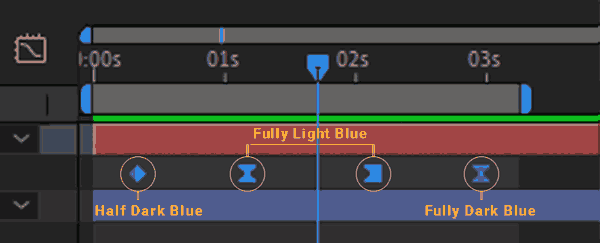
Keyframes with Dual Nature (Selected)
A keyframe might be half darker color (grey if not selected or blue if selected) as well. That happens either when a keyframe doesn’t have another keyframe preceding or succeeding it (Notice first and last keyframes of any animation), or the Hold keyframe has eaten up half of its interpolation.
A keyframe might also be fully darker color (grey or blue) because it could be the last keyframe of the animation (that takes away 2nd half of its interpolation) and has a Hold keyframe before it (which takes the first half of the interpolation). In such a case, your keyframe would be as good as a Hold keyframe regardless of its shape.
8. Roving Keyframes (Rove Across Time):
Roving keyframes are a great way to have your animation be smooth across time, without getting influenced by multiple keyframes but just the first and the last one. Roving keyframes are circular in shape and about 70% in size to that of linear keyframes. Roving Keyframes are always in the middle of the initial and the final keyframes for a property in the timeline. And they don’t behave as interpolation controllers. But they’d rather adjust their speed and timeline spacing according to their respective first and the last keyframes.
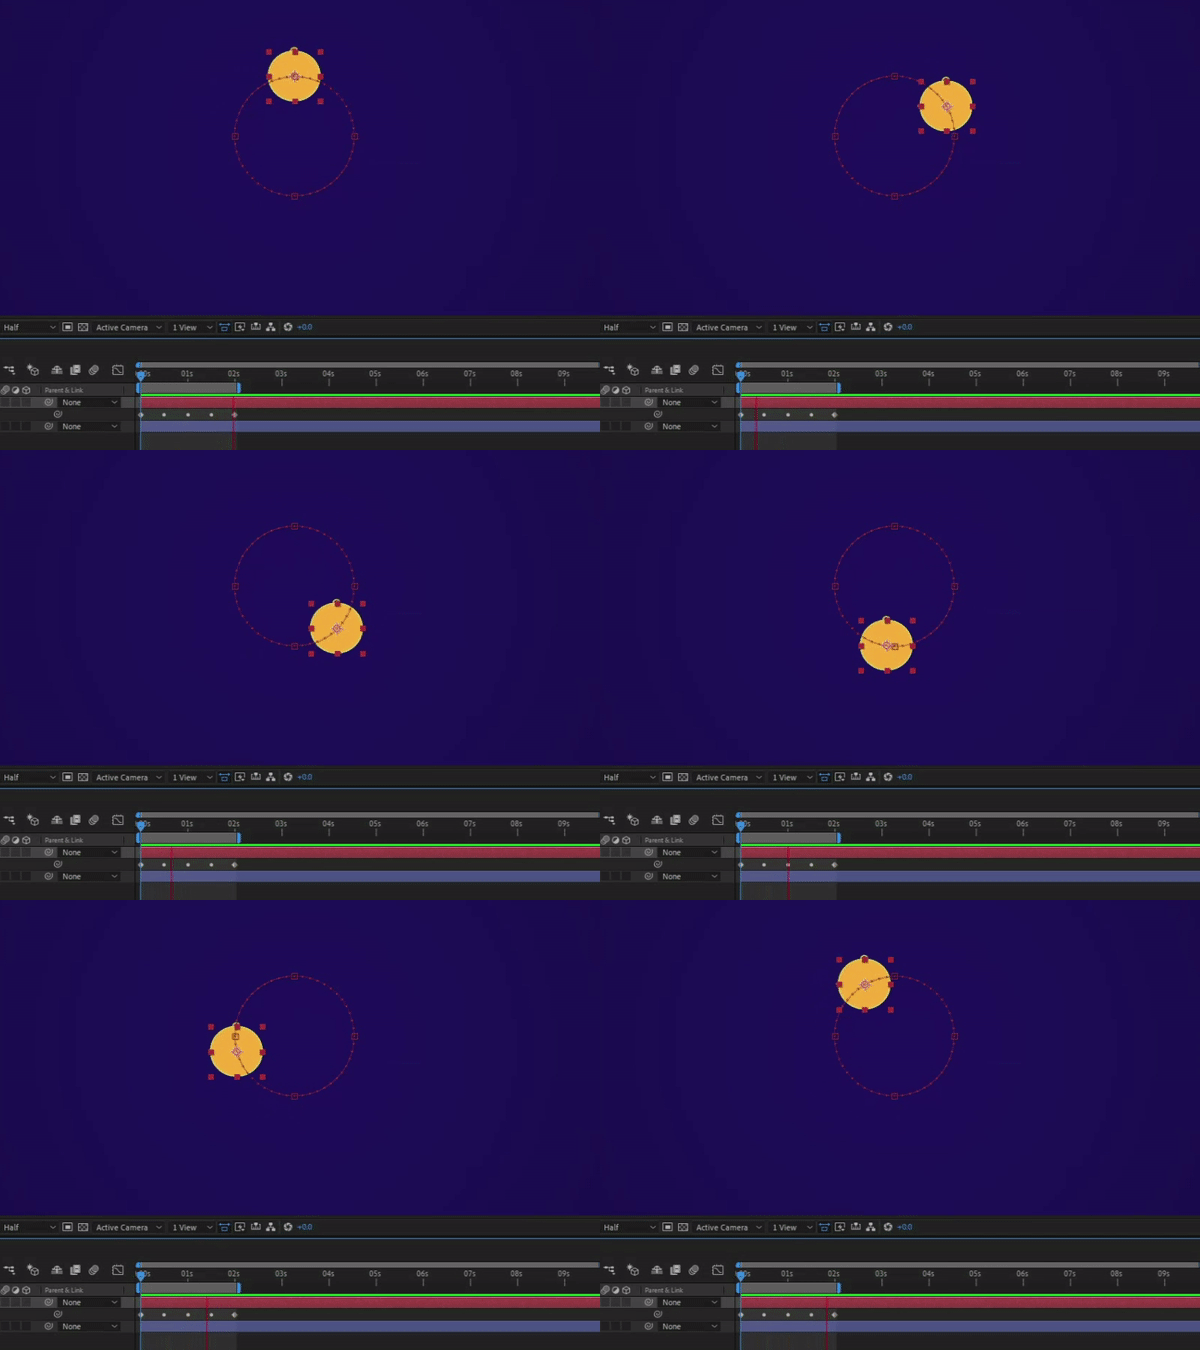
Roving Keyframes and Resulting Animation
Before jumping into the details for Roving keyframes, let’s just point out that Roving keyframes or ‘Rove Across Time’ setting is available just for Spatial properties i.e. Position, Anchor Point etc.
To activate this option, you’ll need to have a Motion Path created with at least three or more keyframes (where the middle ones can rove). Select all the keyframes (or only the ones you want to rove) and do any one of the following:
- Right click (on any of the keyframes) and choose ‘Rove Across Time’ option
- Right click (on any of the keyframes) > Keyframe Interpolation > Rove Across Time (Roving section)
- Animation > Keyframe Interpolation > Rove Across Time (Roving section)
- In the Graph Editor, click on the keyframes menu and choose ‘Rove Across Time’ option
You can also ‘copy a shape path’ (from a shape layer Bezier path) and paste it on the Position property to have the Motion Path same as the shape path. In such a case, the shape anchor points become the keyframes on the Motion Path. And when you copy and paste the path, all the keyframes except the first and last keyframes start roving automatically.
8.1. How to Have a Shape Path as Motion Path:
Draw a shape e.g. an Ellipse using the shape tool. Then (Expand the folds) right click on the Ellipse Path and choose ‘Convert To Bezier Path’. Now that you have a Bezier Path at hand, follow the steps below:
- Add a keyframe on the Path Property (just click on the Stopwatch)
- Copy that keyframe
- Click on the Position Property for the layer you want to add the animation and paste it (Edit > Paste or Ctrl+V for Win and Cmd+V for Mac)
- Tada!! Congratulation, you’ve just added the Bezier Path as the Motion Path with Roving Keyframes.
8.2. Go Back from Roving to Non-Roving Keyframes:
While on one hand you can have the keyframes rove across time, you can also revert this setting back and have the keyframes be normal. To revert it back, just repeat any of the options below. It’s that simple.
- Right click (on any of the keyframes) and choose ‘Rove Across Time’ option
- Right click (on any of the keyframes) > Keyframe Interpolation > Rove Across Time (Roving section)
- Animation > Keyframe Interpolation > Rove Across Time (Roving section)
- In the Graph Editor, click on the keyframes menu and choose ‘Rove Across Time’ option
9. Keyframes as Indices:

So far, all the different types of keyframes that we’ve discussed are actually different types of icons (visually). But, one of the lesser known and relatively hidden features of the keyframes is, that they can be shown as numeric indices (plural of index) instead of icons.
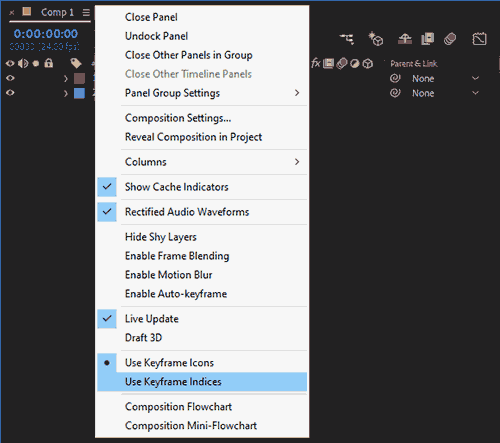
Keyframes as Indices Setting
Keyframes as Indices Icons
To activate this option, you’ll have to go to the top left corner of the Timeline Panel (next to the comp name on the tab) and click on the Hamburger Icon (three horizontal lines) and choose “Use Keyframe Indices” option. The keyframe icons will instantly convert to indices. Cool right? Now to convert back to normal, repeat the same process but choose “Use Keyframe Icons”.
10. Keyframes as Small Dots:
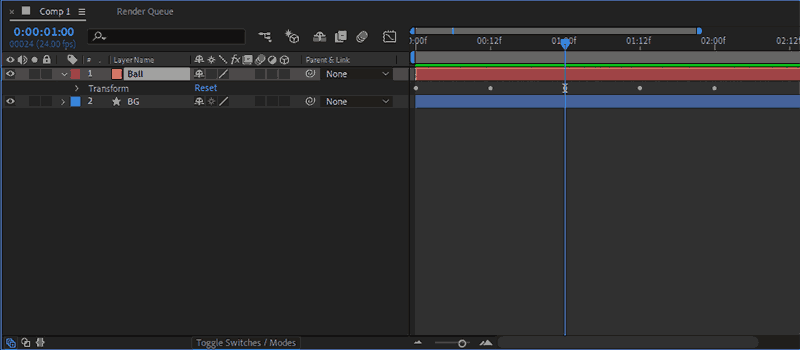
Keyframes can also appear as small round gray dots in the timeline. That happens when an animated property (that has keyframes) e.g. Position is minimized/collapsed, the property group e.g. Transform shows small gray dots in front of it in the timeline.
Commonly Asked Questions:
What are Easy Ease Keyframes?
Easy Ease (Shortcut – F9) is essentially an animation preset with Bezier Interpolation setting in After Effects. This preset is very commonly used to change a Linear (robotic) animation to feel a little more organic. The Easy Ease preset gives acceleration and deceleration at the beginning and end of the animation between any two keyframes respectively.
Which means in Easy Ease setting, your animation will start slow, pick up pace and then get slow again before coming to an end. On the Value Graph, an Easy Ease curve looks like a slight “S”. While on Speed Graph, it looks like a parabola.
In addition to pressing F9 key to apply this preset on selected keyframes, you can also Right Click on any one of the selected keyframes and choose Keyframe Assistant > Easy Ease option from the contextual menu.
Are There any Keyframe Presets Other Than Easy Ease?
Other than Easy Ease (F9) keyframe preset, there are two more keyframe presets i.e. Easy Ease In (Shift + F9) and Easy Ease Out (Cmd + Shift + F9)*. Easy Ease In starts the animation fast then slows it down toward the end, while Easy Ease Out starts the animation slow and then speeds it up towards the end.
To apply these presets on selected keyframes, other than pressing shortcut keys, you can also Right Click on any one of the selected keyframes and choose from Keyframe Assistant > Easy Ease In/Out options from the contextual menu.
* Easy Ease Out Shortcut on Win = Ctrl + Shift + F9
How to Revert an Easy Ease Keyframe to Regular Linear One?
To revert an Easy Ease keyframe back to Linear (diamond) keyframe, hold Command (Ctrl on Windows) and Click on the keyframe or any one of the selected keyframes (if multiple) while in the timeline view. In the graph editor however, you’ll hold Alt/Option and Click on the keyframe or any one of the selected keyframes.
Do you have any questions? Feel free to comment below, we’d love to answer your questions.
Related Content:
Want more on Keyframes? Check out more of our awesome related articles below
Ready to Learn After Effects?
We offer live online short workshops (2 to 5 Days) and bootcamp courses (8 to 12 – Weeks) to learn this amazing application. Whether you’re an absolute beginner or a seasoned professional, we’ve got a course to level up your skills. Check out our courses below!


